How To Sync Etsy Listings With Instagram Shop Without Manual Uploads
If you’re still exporting CSVs or manually adding products to your social shops, you’re losing time and risking inconsistencies. The fastest, most reliable way to sync your marketplace listings to your social storefront is to use an auto-updating data feed that pulls your products directly into Commerce Manager—so every new product, price change, or sold-out status updates on its own.
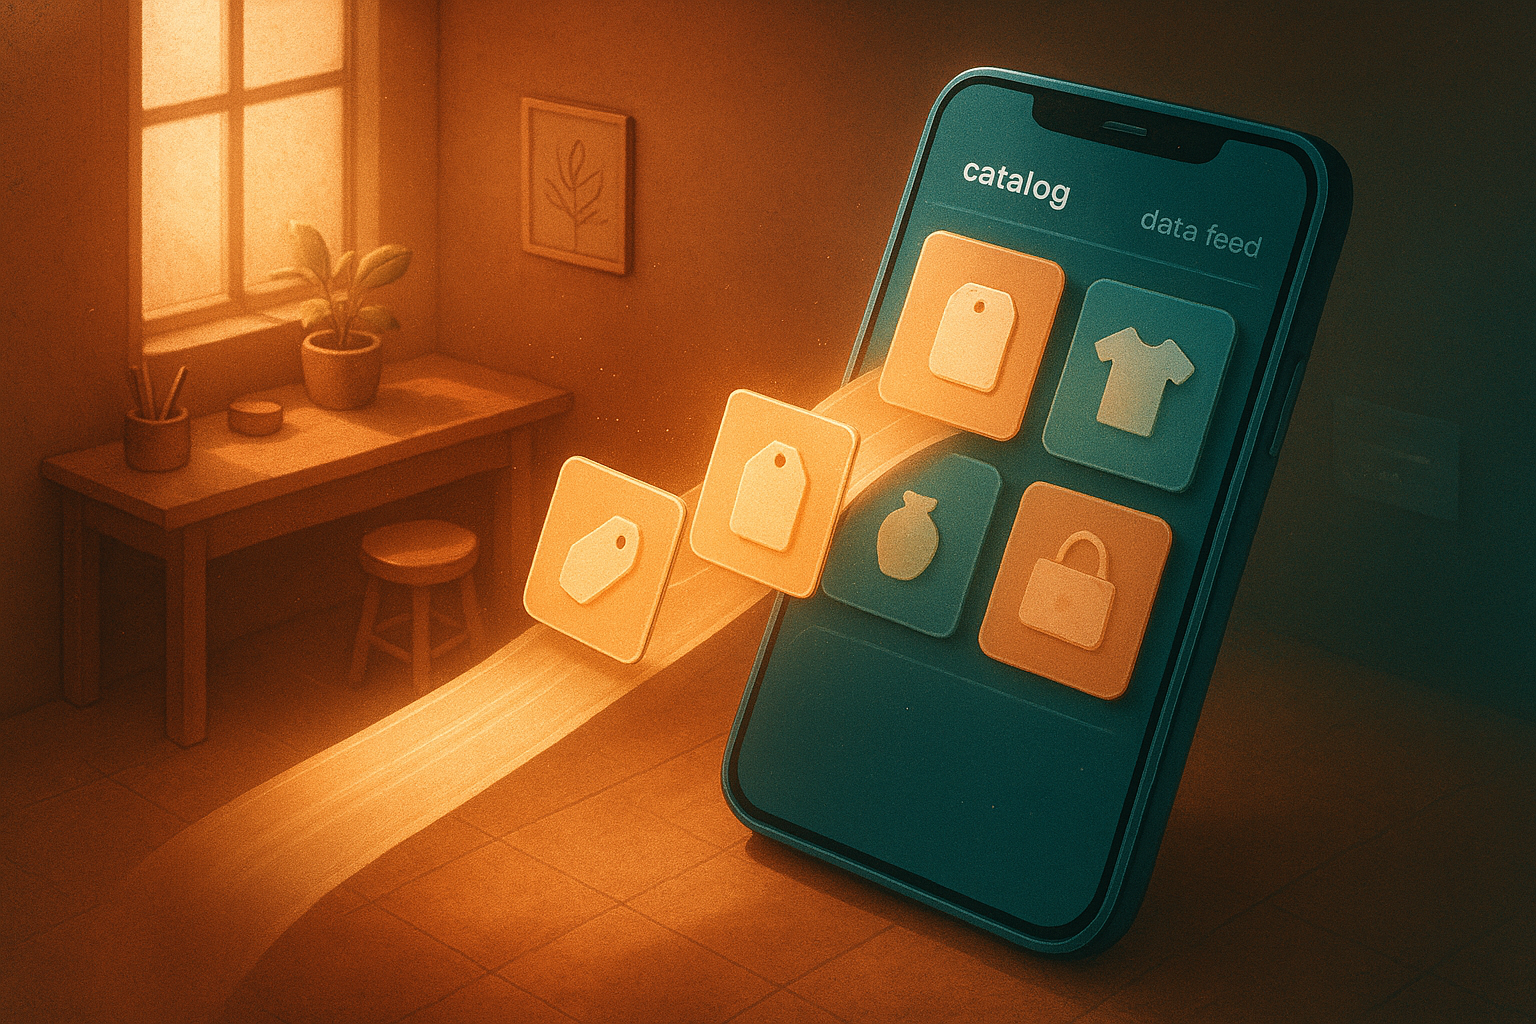
In this guide, you’ll learn exactly how to sync your Etsy listings to Instagram Shop automatically using a live feed URL generated by Catalog Generator, an affordable tool built for Etsy sellers. No manual uploads. No spreadsheet headaches.
Why this method works (and ranks):
- Seamless product tagging on Instagram and Facebook posts, Reels, and Stories
- Automatic daily syncing—no manual re-uploads
- Better discoverability in social shops and a faster path to checkout on your marketplace
- Scalable for shops with many listings or frequent updates
Start here: Catalog Generator for Etsy automatically builds a compliant product feed for social commerce. Try it here: https://catalog-generator.webyze.com/ (7-day free trial, then just $5/month).
What you’ll need
- A Business account in Meta’s Business Manager (linked to your Facebook Page and Instagram Professional account)
- Your shop’s custom marketplace domain (format: yourshop.etsy.com)
- A live product feed URL from Catalog Generator
Step-by-step: Sync Etsy listings with Instagram Shop (no manual uploads)
- Create or confirm your Business Manager setup
- Go to https://business.facebook.com/
- Link your Facebook Page and Instagram Professional account to the same Business Manager
- Switch Instagram from a personal to a Professional account if you haven’t already (it’s free and required for product tagging)
- Verify your shop domain in Business Manager
- In Business Settings, go to Brand Safety and Suitability > Domains
- Click Add and enter your custom shop domain: yourshop.etsy.com
- Copy the meta tag provided by Business Manager
- In your Etsy Shop Manager, go to Settings > Facebook Shops, paste the meta tag, and click Connect
- Return to Business Manager and click Verify
Pro tip: Make sure you entered the exact subdomain (yourshop.etsy.com). You can test it by visiting it in a browser—it should redirect straight to your shop.
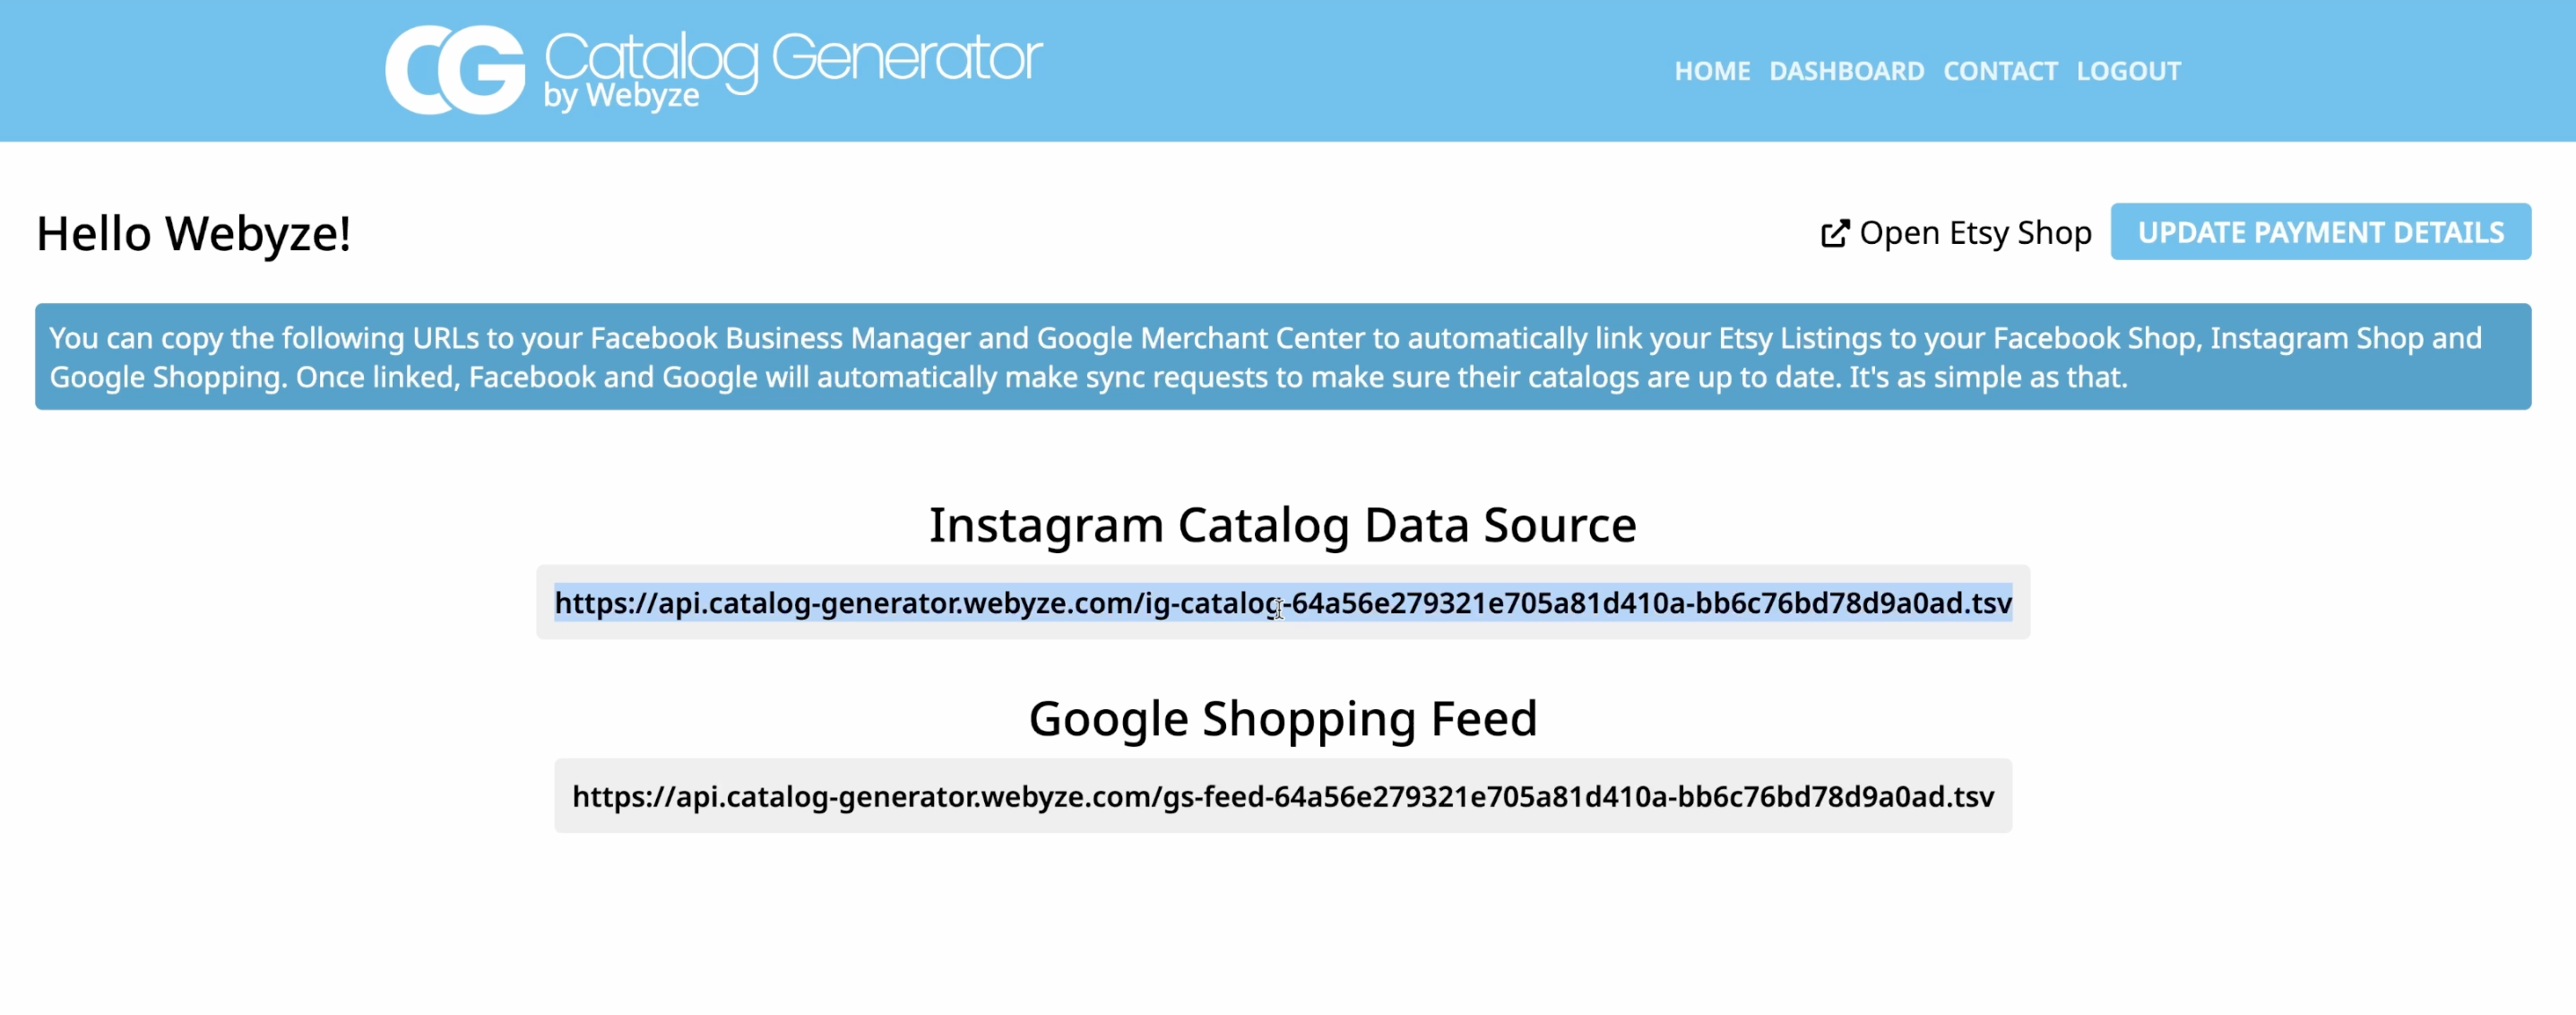
- Generate an auto-updating feed URL with Catalog Generator
- Visit https://catalog-generator.webyze.com/
- Sign up and connect your Etsy shop
- Copy the feed URL the app provides (this is your live data source)
- Enjoy a 7-day free trial; after that, it’s only $5/month and you can cancel anytime
- Add your feed in Commerce Manager
- Open Commerce Manager and select your catalog (or create a new one)
- Go to Items > Add Items > Data feed
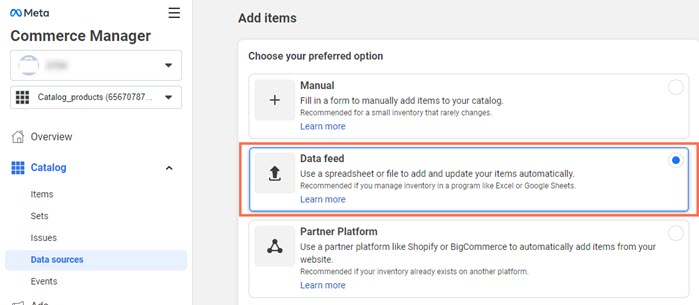
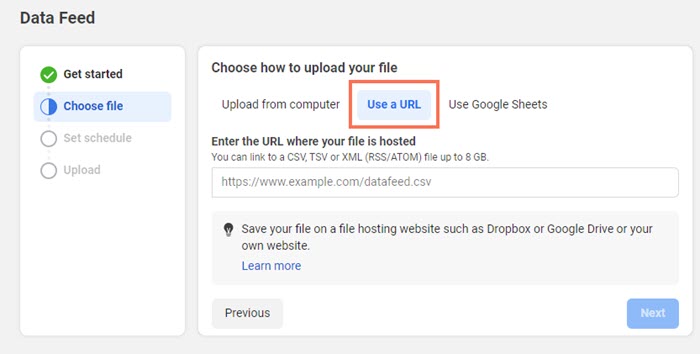
- Choose Use a URL (not manual file upload)
- Paste the Catalog Generator feed URL
- Set a fetch schedule (daily works great)
- Save feed and upload
After a few minutes (longer for large catalogs), your items will appear under Items in Commerce Manager. From now on, changes to your Etsy listings sync automatically on the schedule you chose.
- Submit your domain for approval
- In Commerce Manager, go to Settings > Catalog
- Under Not submitted, submit your verified domain for approval
- Once approved, you can tag products in posts, Reels, and Stories, and enable product tagging by customers
Bonus: Feed once, sell everywhere
- The same data source you create with Catalog Generator can also help with Google Shopping. By centralizing your product data in a single, auto-updating feed, you simplify omnichannel listings and reduce maintenance.
Clear, visual walkthrough
- Watch the step-by-step video tutorial: https://www.youtube.com/watch?v=2ChLE92Cu4s
Best practices for smooth approval and maximum reach
- Use high-quality images (square 1024×1024+), clear backgrounds, and consistent lighting
- Ensure titles are descriptive and include key phrases shoppers search for (material, style, use-case)
- Keep pricing and availability accurate—your feed will handle updates automatically
- Map item categories properly to improve discovery in social shops
- Avoid policy violations (restricted items, unclear shipping, or missing return info)
Troubleshooting tips
- Domain didn’t verify: Double-check the exact subdomain (yourshop.etsy.com). Re-paste the meta tag in Etsy > Settings > Facebook Shops, then retry verification after a few minutes.
- Products not importing: Confirm you chose Data feed > Use a URL, and that the feed URL is reachable. Try a manual fetch in Commerce Manager.
- Rejected items: Check for missing images, mismatched currencies, or prohibited content. Update the listing in your shop; the next scheduled fetch will reprocess it.
- Variants missing: Ensure variants have unique options, pricing, and images where possible.
FAQs
Q: How often does the sync run?
A: You can schedule Commerce Manager to fetch daily (recommended). You can also trigger a manual fetch if you need an immediate update.
Q: How often does the sync run?
A: You can schedule Commerce Manager to fetch daily (recommended). You can also trigger a manual fetch if you need an immediate update.
Q: Does this work if I add or archive products frequently?
A: Yes. The feed automatically reflects new, updated, and inactive listings, so your social shop stays accurate without manual uploads.
A: Yes. The feed automatically reflects new, updated, and inactive listings, so your social shop stays accurate without manual uploads.
Q: How much does it cost?
A: Catalog Generator offers a 7-day free trial and then only $5/month. Cancel anytime. Details and signup: https://catalog-generator.webyze.com/
A: Catalog Generator offers a 7-day free trial and then only $5/month. Cancel anytime. Details and signup: https://catalog-generator.webyze.com/
Q: Can I run multiple shops?
A: You can connect your shop within the app and create a distinct feed URL for each catalog you manage in Commerce Manager.
A: You can connect your shop within the app and create a distinct feed URL for each catalog you manage in Commerce Manager.
Take action: Set it up in 15 minutes
- Generate your live feed with Catalog Generator: https://catalog-generator.webyze.com/
- Add the feed in Commerce Manager and schedule daily fetches
- Submit your domain and start tagging products in posts and Stories
When your listings sync to Instagram Shop automatically, you post once and sell everywhere—without repetitive uploads or spreadsheet wrangling. Try the 7-day free trial today and turn your social audience into buyers with a shop that always stays in sync.