How To Publish Notion Blog Posts To Webflow CMS Automatically
If your team drafts in Notion but publishes on Webflow, you know the pain of copy-paste, broken formatting, and out-of-date posts. The fastest way to fix that is to connect your content pipeline so your Notion pages become Webflow CMS items automatically.
In this guide, you will learn exactly how to publish Notion blog posts to Webflow CMS automatically using SyncFlow, plus field-mapping tips, SEO best practices, and troubleshooting steps.

Why automate Notion to Webflow CMS
- Ship faster: Turn drafts into live posts without manual copy-paste.
- One source of truth: Write once in Notion and let Webflow update itself.
- Fewer formatting errors: Preserve headings, images, code blocks, math, and lists.
- Always up to date: Auto-publish edits from Notion in near real time.
- Team-friendly: Writers stay in Notion; designers style in Webflow.
The tool: SyncFlow — Notion–Webflow sync made simple
SyncFlow connects a Notion database to a Webflow CMS collection so your content flows automatically. Key capabilities include:
- Auto-Sync and Auto-Publish for hands-off publishing.
- Versatile field types: text, rich text, images, checkboxes, dates, URLs, and more.
- Fully customizable rendering: import with inline styles or use classes for total control in Webflow.
- Page linking: Notion page mentions become internal links between Webflow posts.
- Code highlighting and TeX support for technical and academic content.
Ready to try it? Get started here: https://syncflow.ybouane.com/
Step-by-step: publish Notion blog posts to Webflow automatically
Follow these steps to connect your Notion database to your Webflow blog collection.
- Install and connect
- Visit SyncFlow: https://syncflow.ybouane.com/ and select Get Started.
- Approve access to your Webflow sites when prompted.
- Create or log in to your SyncFlow account.
- In Webflow Designer, open the SyncFlow app.
- Connect Notion in the app and choose the workspace, page, or folder you want to sync.
- Create a sync task
- In SyncFlow, select Sync a new database.
- Choose the Webflow CMS collection you want to sync, such as Blog Posts.
- Pick an existing Notion database or let SyncFlow create one with the right fields.
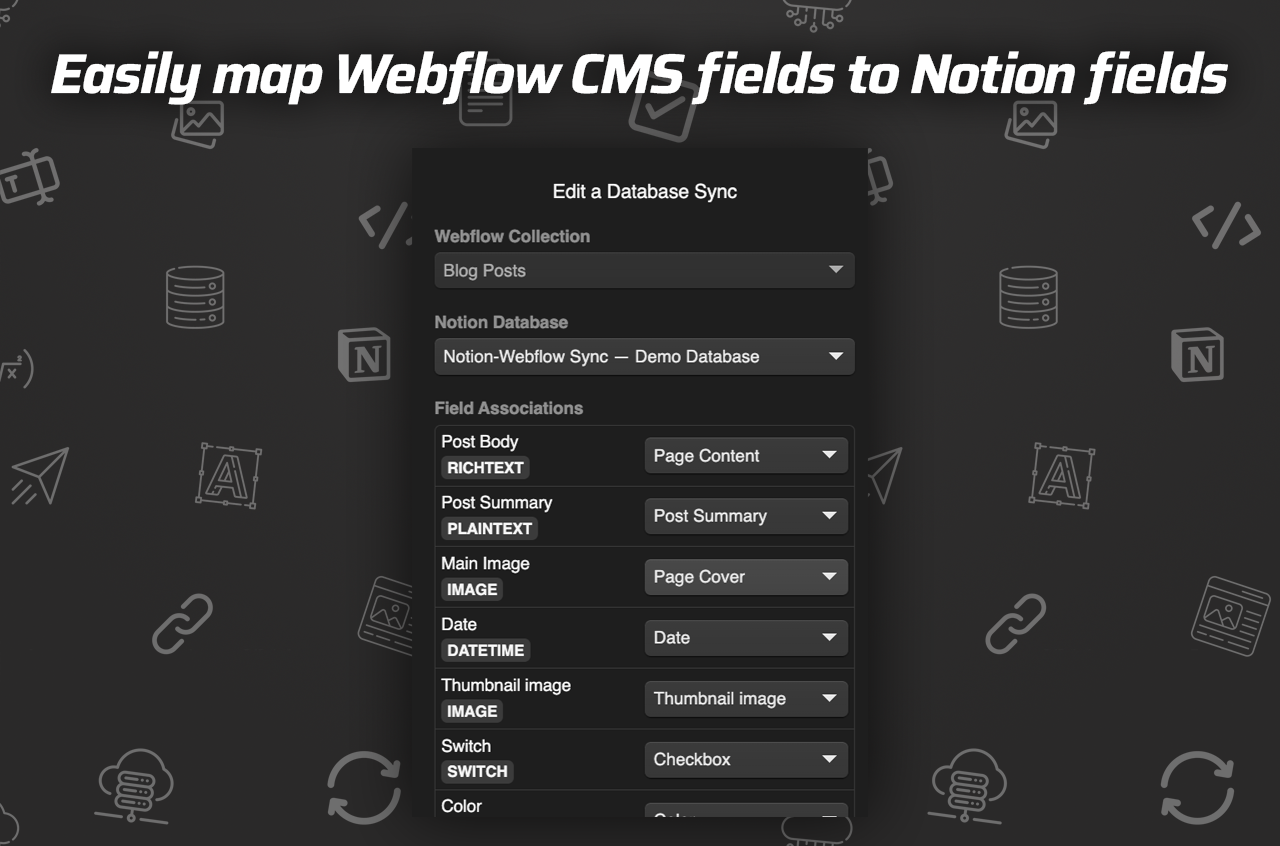
- Map fields
- Map each Webflow field to a Notion property:
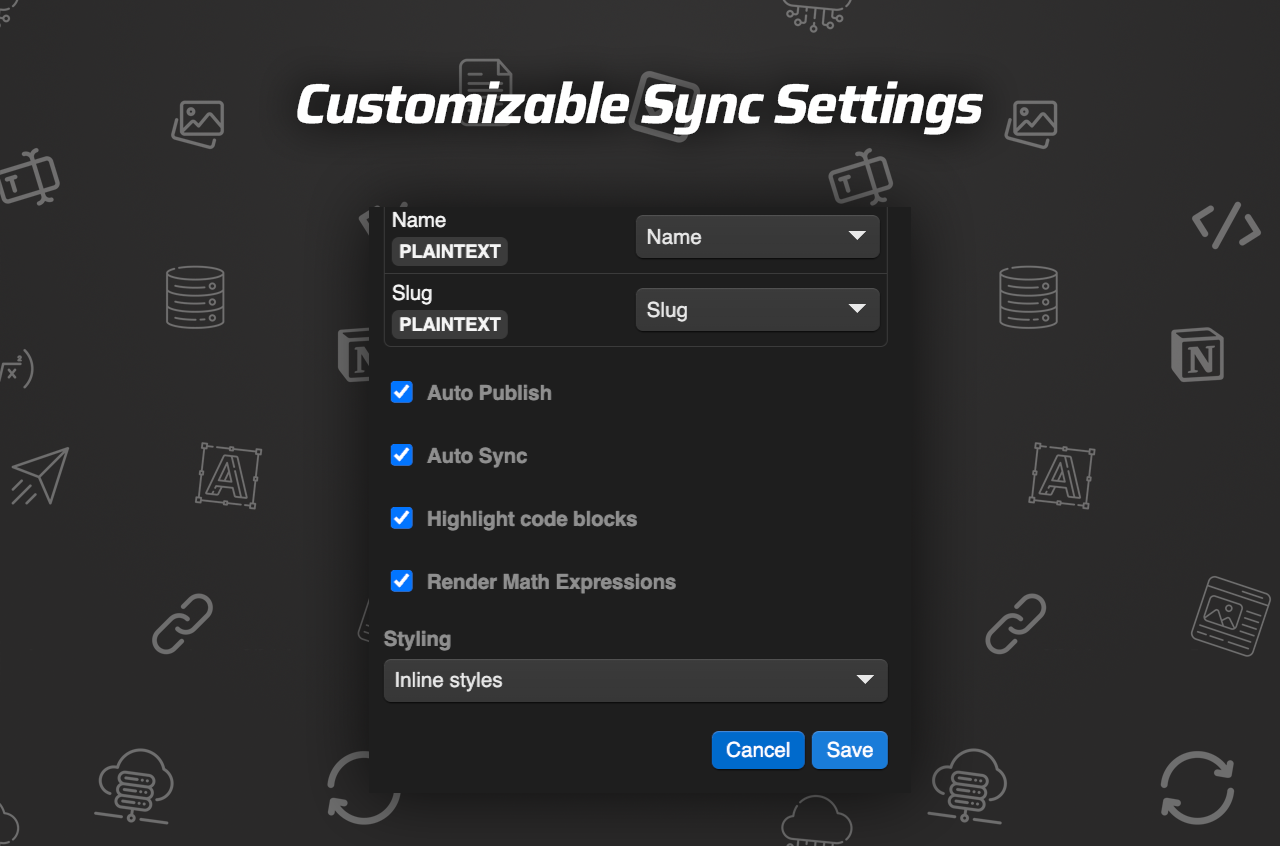
- Configure sync settings
- Enable Auto-Sync so updates in Notion propagate to Webflow.
- Toggle Auto-Publish to push content live after sync.
- Turn on code highlighting if you publish technical posts.
- Enable math rendering for scientific or academic posts.
- Choose styling mode:
- Save and verify
- Save your SyncFlow settings.
- Add a new entry in your Notion database or update an existing one.
- Check the sync status in the Webflow collection.
- After a short delay, view the new or updated item in your Webflow CMS.
Optional: Use Full Resync to align an existing Webflow collection with your Notion database.
Pro tips for a polished, SEO-friendly workflow
- Use a clean Notion template: Include title, subtitle, excerpt, hero image, tags, author, and the body. Keep properties consistent so mapping is simple.
- Map SEO metadata: Create Notion properties for meta title, meta description, and optionally open graph title/description. Map them to Webflow fields so on-page SEO stays in sync.
- Generate slugs automatically: Either keep a dedicated Notion property for the slug or let SyncFlow generate slugs from the title. Be consistent to avoid duplicate URLs.
- Optimize images: Store a single hero image property in Notion that maps to the featured image in Webflow. For inline images, keep alt text in the paragraph directly above or below the image in Notion, and add it to Webflow after import if needed.
- Styling strategy: Choose Use classes if you want to enforce brand typography and spacing in Webflow. Inline styles can be great for speed or complex formatting like nested callouts.
- Code and math: Enable code highlighting and math rendering to keep technical posts readable and accurate.
- Internal linking: Notion page mentions automatically become Webflow internal links, which helps SEO and time-on-page.
Common pitfalls and how to fix them
- Mismatched fields: If a Notion property type does not match the Webflow field type, adjust the mapping or the property type. For example, a multi-select in Notion works well for Webflow multi-reference fields.
- Missing permissions: If your content is not syncing, recheck Notion and Webflow permissions in the SyncFlow app and re-authenticate if needed.
- Slug conflicts: If a slug already exists, update the slug property in Notion or delete the duplicate item in Webflow, then resync.
- Image not appearing: Ensure the Notion property is a files property and is mapped to an Image or Asset field in Webflow.
- Staging vs production: If Auto-Publish is off, your content may only be in the CMS. Toggle Auto-Publish to push it live, or publish your site from Webflow.
Watch the complete tutorial
Prefer to see it in action? Watch the full walkthrough:
- How to sync Notion with Webflow — Full Tutorial: https://www.youtube.com/watch?v=_890vYoe3KQ
- Trailer overview: https://www.youtube.com/watch?v=HGjBCLL3anc
Pricing at a glance
- Standard plan: 8$/month
- 1 Webflow site install
- Unlimited syncs, databases, and connected fields
Compare plans and start your trial here: https://syncflow.ybouane.com/
FAQ
- Does this truly auto-publish from Notion to Webflow?
Yes. Enable Auto-Sync and Auto-Publish in SyncFlow to push changes automatically from your Notion database into your Webflow CMS and live site.
- What kinds of content blocks are supported?
Rich text, images, checkboxes, dates, URLs, code blocks with highlighting, and even math expressions can be rendered. You can import with inline styling or map to classes.
- How do internal links work?
Page mentions in Notion are converted into links between Webflow CMS items, improving navigation and SEO.
- Can I style the imported content to match my brand?
Yes. Use classes mode to hook imported elements to your Webflow typography and spacing system for pixel-perfect control.
- What if I already have posts in Webflow?
Use the Full Resync option to align your existing collection with your Notion database.
Final thoughts
When your writers work in Notion and your site runs on Webflow, manual copy-paste creates friction. SyncFlow removes that friction with a reliable Notion to Webflow CMS automation. Set it up once, map your fields, and let Auto-Sync and Auto-Publish keep your blog fresh without busywork.
Launch your automated pipeline today: https://syncflow.ybouane.com/